 Save
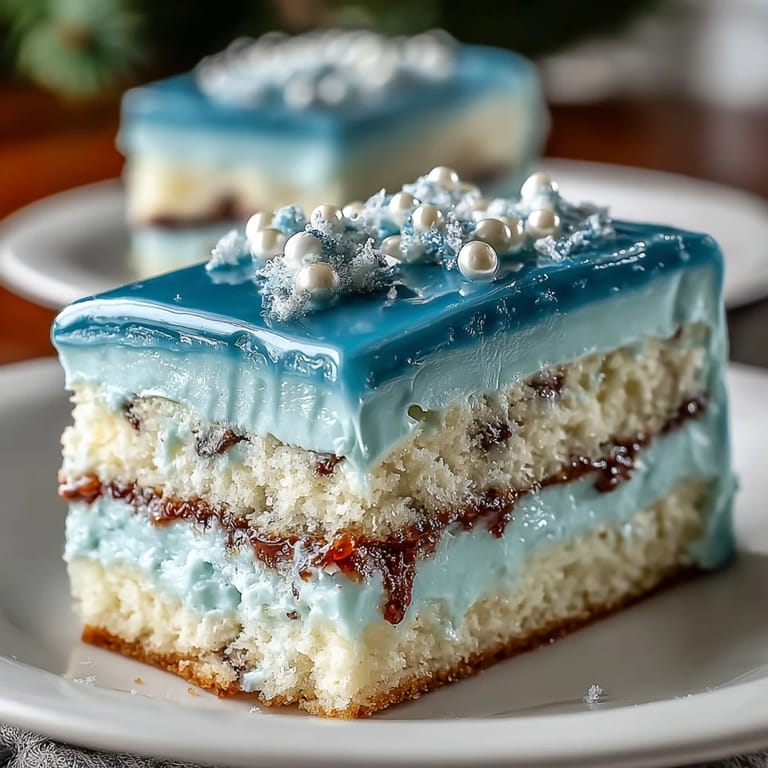
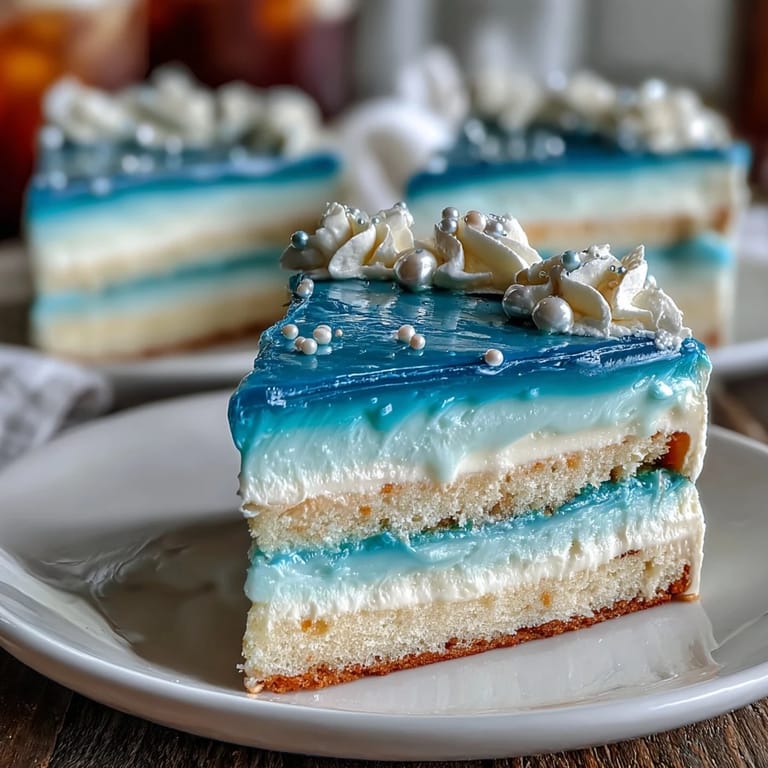
Save My cousin texted me three weeks before her graduation asking if I could bake something special for her party. When she said she wanted an ombre cake in her school colors, I'll admit I panicked a little—not because of the baking itself, but because I wanted it to look effortlessly beautiful, the kind of cake that makes people stop mid-conversation to take a photo. That afternoon in the kitchen, mixing batters and watching each one transform into a slightly deeper shade, something clicked. This cake became my love letter to that milestone moment, and watching her face light up when she saw those four perfect graduated layers made every careful step worth it.
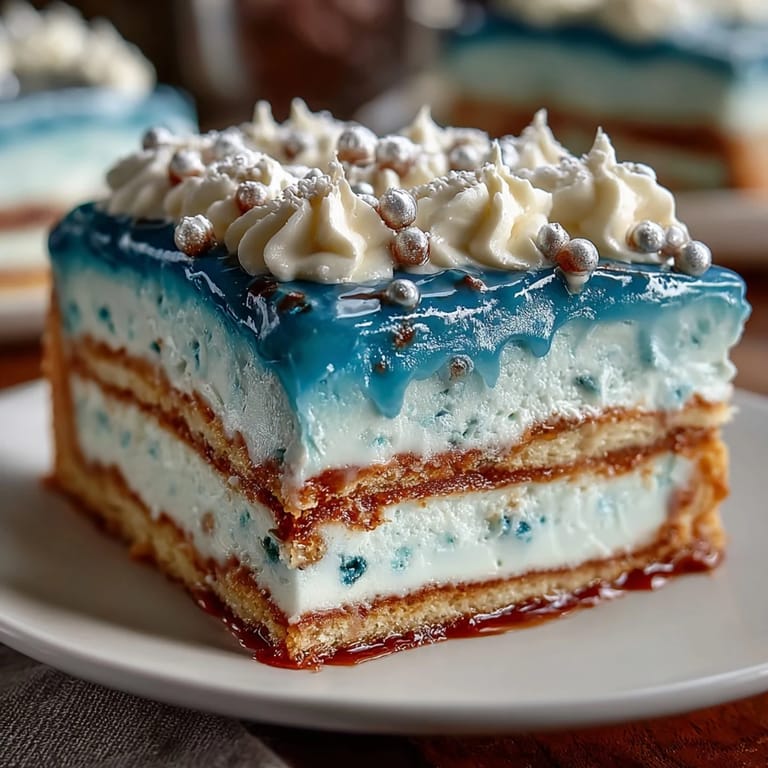
I spent the night before the party with my hands covered in buttercream, piping practice swirls onto parchment paper in my kitchen while half-listening to a podcast. My partner wandered in around midnight, took one look at the cake cooling on the counter with its four distinct layers glowing under the kitchen lights, and just said, "That's art." It wasn't fancy or complicated—just four cake layers in increasing shades of blue, waiting to be frosted—but in that quiet moment, I realized why people love marking celebrations with homemade cake. It's not about perfection; it's about showing up with something you made with your own hands.
Ingredients
- All-purpose flour (3 1/4 cups): The foundation of a tender, foolproof cake layer that rises evenly and doesn't turn cakey-dense; room temperature ingredients will mix more smoothly.
- Baking powder (2 1/2 tsp): Your leavening agent that ensures the cake rises gently and bakes through in the time given—don't skip sifting it with the flour.
- Salt (1/2 tsp): A small amount that amplifies all the sweet flavors and keeps the cake from tasting one-dimensional.
- Unsalted butter (1 cup for cake, plus 1 1/2 cups for buttercream): Softened butter creams better with sugar and creates a fine crumb; having it at room temperature makes a visible difference in texture.
- Granulated sugar (2 cups): The sweetness and structure of your cake batter comes here, and creaming it properly with butter incorporates air for lift.
- Large eggs (4, room temperature): Each egg should be at room temperature so it blends seamlessly without breaking the emulsion or deflating your fluffy batter.
- Vanilla extract (1 tbsp): A generous splash that balances sweetness and adds subtle depth without being cloying.
- Whole milk (1 1/4 cups, room temperature): Alternating this with flour keeps the batter from becoming tough and ensures even moisture throughout.
- Gel food coloring in graduation theme colors: Gel coloring is concentrated and won't add water to your batter like liquid coloring would, so your ombre stays vibrant and intentional.
- Egg whites (6 large): These form the base of a silky Swiss meringue buttercream that's more stable than American buttercream and won't break or curdle.
- Edible gold or silver pearls: Optional but they catch light beautifully and make the cake feel celebratory without overwhelming the gradient.
Tired of Takeout? 🥡
Get 10 meals you can make faster than delivery arrives. Seriously.
One email. No spam. Unsubscribe anytime.
Instructions
- Prep your pans and preheat:
- Set your oven to 350°F and line four 8-inch round pans with parchment—greasing the pan sides first helps the parchment stick. This setup is key to getting four even layers that rise at the same rate.
- Build the dry mix:
- Whisk flour, baking powder, and salt together in a medium bowl. Sifting isn't strictly necessary if your flour is fresh, but it aerates everything and prevents lumps from hiding in the finished cake.
- Cream butter and sugar until fluffy:
- Beat them together for 3 to 4 minutes until the mixture looks pale and fluffy, almost like frosting. This is where you're incorporating tiny air bubbles that will make your cake rise gently and feel tender.
- Add eggs one at a time:
- After each egg, wait until it's fully combined before adding the next—this prevents the batter from looking separated or curdled. If it does look broken, an extra 30 seconds of mixing usually brings it back together.
- Incorporate vanilla and alternate wet and dry:
- Start with some flour mixture, then milk, then flour again, ending with flour. This sandwich method prevents overmixing, which would develop gluten and make the crumb tough.
- Divide and tint for ombre:
- Split the plain batter into four equal bowls, then add just a tiny drop of gel coloring to the first, a bit more to the second, and so on until you have a clear gradient. The colors should look intentional but not artificial—think of sunset shades rather than neon.
- Pour and bake:
- Distribute each colored batter into its prepared pan, smooth the tops gently, and slide them all into the oven. At 22 to 25 minutes, a toothpick should come out clean; if it has wet batter on it, give them another minute or two.
- Cool with patience:
- Let the layers rest in their pans for 10 minutes—this prevents them from cracking when you turn them out onto wire racks. Once they're completely cool, you're ready to frost.
- Make the Swiss meringue buttercream:
- Whisk egg whites and sugar in a heatproof bowl over simmering water, stirring constantly until the sugar dissolves and the mixture reaches about 160°F. This step pasteurizes the eggs and ensures a safe, silky buttercream.
- Whip to stiff peaks:
- Transfer to a stand mixer and whip on high speed for about 10 minutes until the bowl feels cool to the touch and stiff peaks form. This takes longer than you'd expect, but patience here creates that luxurious, cloud-like texture.
- Add butter gradually:
- Add softened butter a few cubes at a time, mixing well between additions. If the buttercream looks slick or separated, don't panic—keep mixing; it will come back together once it emulsifies.
- Stack and crumb coat:
- Place your darkest layer on a cake stand, spread a thin layer of buttercream on top, and repeat with the remaining layers, finishing with the lightest color on top. The crumb coat seals in any loose crumbs before you apply the final frosting.
- Chill and finish:
- After the crumb coat sets for 20 minutes in the fridge, apply your final buttercream layer, blending the colors slightly if you want a softer ombre effect. Add any decorations—pearls, a graduation topper, or delicate piping—and chill until you're ready to serve.
 Save
Save The moment my cousin's friends started gathering around the cake with their phones, asking to take pictures before cutting into it, I understood something I'd only read about before: a homemade celebration cake becomes a memory in itself. Every layer told a story, and the colors matched her class perfectly. That's when baking stops being about technique and becomes about love.
Why Ombre Works for Milestones
Ombre cakes feel significant because the gradient naturally draws the eye upward—it's visual movement and intention in every slice. When you serve a piece, each layer shows through, and people see the work and care behind it. I've learned that the most meaningful cakes are often the ones where someone can taste the effort, and an ombre design does that without requiring advanced decorating skills. The four layers stacked in order feel like a metaphor for growth, progress, or reaching a peak, which is why this cake feels so right for graduations.
Troubleshooting Color Intensity
The first time I made this cake, I was nervous the colors wouldn't show through clearly in the finished product. I used liquid food coloring because it was what I had, and the colors came out pale and watery. The second time, I invested in gel coloring and added it drop by drop, mixing just until the batter was evenly tinted. The difference was stunning—the colors remained vibrant even after baking and frosting. If your finished layers look pale, it's usually because the coloring was too diluted or you didn't use enough of it; next time, trust that gel coloring looks intense in the batter and will bake to a beautiful, visible shade.
Scaling and Variations
You can make this cake in just two layers if you don't have four pans, though you'll need to adjust the baking time slightly—a thicker cake might take 30 to 35 minutes instead of 22 to 25. For a chocolate ombre version, replace a quarter cup of flour with cocoa powder in each layer, increasing the amount slightly with each iteration. Some people add a teaspoon of almond extract to the vanilla for extra depth, or infuse the buttercream with lemon zest for brightness. The beauty of this recipe is that the ratio stays stable no matter what you add, so experimenting feels safe.
- If you're serving this at a warm outdoor event, make sure to chill the cake and keep it in a cool spot; buttercream can soften faster than you'd expect in heat.
- Decorations can go on hours ahead of time, but wait to serve the cake at room temperature for the best flavor and texture.
- Leftovers keep beautifully covered in the fridge for up to three days, and the flavors actually deepen slightly as they sit.
 Save
Save Making this cake taught me that celebration food doesn't have to be complicated to feel special—it just has to be made with intention. Serve it at room temperature so every flavor and texture shines through, and watch how people light up when they see those perfect layers.
Recipe Questions & Answers
- → How is the ombre effect achieved in the layers?
The batter is divided into sections and tinted with increasing amounts of gel food coloring to create a smooth gradient before baking.
- → What type of frosting complements the layers?
Swiss meringue buttercream is whipped to a silky texture, then tinted to match or accent the cake’s ombre colors for a seamless finish.
- → Can the colors be customized for different themes?
Yes, gel food coloring allows flexible customization to match school colors or any preferred palette.
- → What is the best way to assemble the layers?
Layers are stacked from darkest to lightest color, with even layers of buttercream in between, followed by crumb coating and final frosting.
- → Are there tips for intensifying color brightness?
Using gel food coloring instead of liquid ensures richer, more vivid hues in each layer.